

DIY Sugar Mold Easter Diorama | Nostalgic Easter Craft
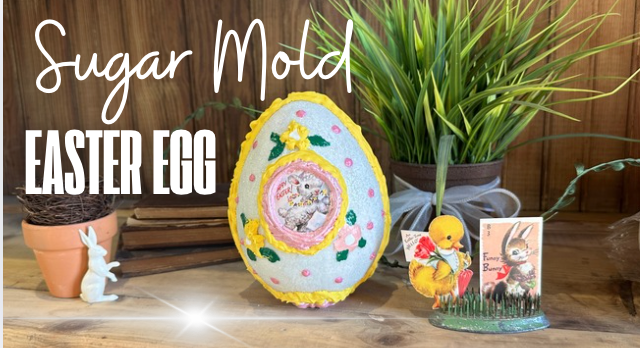
I vividly remember making sugar mold Easter dioramas as a kid. There was something so magical about those glittering, hollowed-out eggs with their tiny scenes inside. I decided to bring that nostalgia back, but instead of sugar, I recreated this look using a foam egg, IOD’s brand-new Vintage Brooches mould, and a touch of clear glitter for that sugary sparkle.
This DIY Easter craft turned out to be the perfect addition to my seasonal antique cabinet by my front door. Let me show you exactly how I made it!
Materials I Used:
- Foam Egg (as the base instead of sugar)
- Primer & White Paint (to prep the egg)
- Glue & Clear Glitter (to mimic sugar)
- Varnish (to seal the glitter)
- Vintage Easter Images (one inside for the diorama, one on top for decoration)
- IOD Vintage Brooches Mould
- Air-Dry Clay
- Pentart Light Modeling Paste
- Yellow Paint
- Palette Knife
- Ziploc Bag (for piping details)
- Paintbrush
- Scissors
- X-Acto Knife
- Glue & Double-Sided Tape
- Mini Flowers (for embellishments)
Step-by-Step Tutorial:
Step 1: Prepping the Egg
To start, I applied primer to the foam egg, followed by white paint to create a clean, smooth base. This ensures that the glitter sticks evenly.
Step 2: Creating the Sugary Look
I brushed on a layer of glue, then sprinkled clear glitter all over the egg. This step makes the egg look just like those old-fashioned sugar dioramas. Once dry, I sealed the glitter with varnish to prevent shedding.
Step 3: Adding the Vintage Images
I carefully glued one vintage Easter image inside the hollowed-out area of the egg, creating the classic diorama effect. I then attached another Easter image on the top of the egg for added charm.
Step 4: Casting the IOD Vintage Brooches Mould
I used two different methods for casting the brooch frames:
- Method 1: I cast just the frame part of the mould and placed it in the freezer for easy removal.
- Method 2: I cast the entire mould, then used an X-Acto knife to cut out the middle section, leaving just the frame.
Step 5: Attaching the Brooch Frames
Once the castings were dry, I glued them onto the egg, framing the inside diorama perfectly.
Step 6: Decorative Details
To add even more vintage charm, I mixed Pentart Light Modeling Paste with yellow paint, placed it in a Ziploc bag, and piped it around the egg’s seam—mimicking where the two halves of a traditional sugar egg would have been joined.
Step 7: Embellishing with Flowers & Polka Dots
For the finishing touches, I added tiny flowers around the egg and painted polka dots on the top. This step really tied everything together!
The Final Reveal
This Easter diorama turned out just as magical as I remembered from childhood! It now sits beautifully on my seasonal antique cabinet by my front door, bringing a nostalgic touch to my Easter decor.
Tips for Your Own DIY Sugar Mold Diorama:
✔ Use fine, clear glitter for the most authentic sugar-like effect. ✔ Make sure to seal the glitter with varnish so it doesn’t flake off. ✔ Experiment with different brooch frames—they can completely change the look! ✔ If cutting out the mould's center, use a sharp X-Acto knife for precision.
Final Thoughts
This project brought back so many childhood memories, and I love how it turned out. If you create your own vintage-inspired Easter diorama, I’d love to see it! Tag me on Instagram or comment below with your thoughts.
Happy Easter crafting! 🐣✨
Share:
DIY Classic Antique Brooches | IOD Vintage Brooches Mould
Pentart Paints How are They Diffenect and When to Use Them